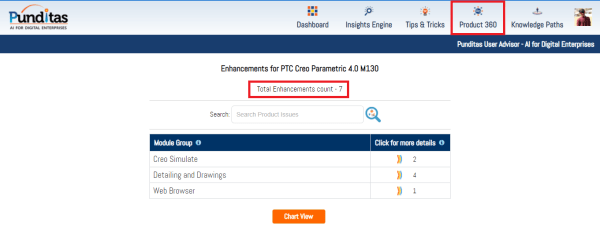
PTC released Creo 4.0 M130 recently. Punditas AI Advisor now supports this latest version of Creo 4.0 M130. Punditas AI allows users to learn more about “How”, What” and “Why” of these enhancements through Product 360 module. The picture below shows the Module groups and the corresponding enhancements added within each group. To try this... Continue Reading →
Do you like the improved appearance of handles, text, dimensions, and lines in Creo?
Starting with Creo 5.0, the appearance of handles, text, dimensions, and lines (2D and 3D) displayed in the graphics area have improved visibility. In addition, Lines Anti-Aliasing and Text Anti-Aliasing can also be controlled. For example - you can set Lines Anti-Aliasing to On even if the Anti-Aliasing is set to Off. I think these are improvements are definitely useful. What are your thoughts?... Continue Reading →
Have you tried Lines Anti-Aliasing in Creo?
Starting with Creo Parametric 5.0.0.0, there are 2 new options to control anti-aliasing of lines or text - Lines Anti-Aliasing and Text Anti-Aliasing To turn On or Off these controls, just goto File > Options > Entity Display as shown below Below is an excerpt from PTC that shows how you can set Lines Anti-Aliasing to On even if the Anti-Aliasing is set to Off. Notes about... Continue Reading →
Punditas AI Advisor now supports Creo 5.0.6.0
PTC released Creo 5.0.6.0 recently. Punditas AI Advisor now supports this latest version of Creo 5.0.6.0. Punditas AI allows users to learn more about “How”, What” and “Why” of these enhancements through Product 360 module. The picture below shows the Module groups and the corresponding enhancements added within each group. To try this out, please... Continue Reading →
Did you know you cannot drag surface finishes off the model surfaces that are created flat to screen in Creo?
That's correct. Flat to screen surface finishes do not have a directional annotation plane and do not support an extension line. You cannot drag surface finishes off the model surfaces that are created flat to screen. In Creo, if the placement surface is planar, then you can drag surface finishes in the XY direction beyond... Continue Reading →
How do you indicate placement of datum target on a surface in Creo?
With PTC Creo 4.0, the dashed leader line option can be used to indicate the placement of datum target on surface on the far side of the drawing view. To set the dashed leader line, select the "Far side" option in the Datum Target tab as shown below About Datum Target ribbon The Datum Target ribbon in Creo... Continue Reading →
Did you know about these MBD related checks in Creo?
With Creo 6.0, PTC has enhanced ModelCheck to include additional checks for tolerances, annotations, features, and combined states. For example - Annotations that are not referencing any surfaces Annotations not included in any combined state ModelCheck can identify any combined states that are not following the naming conventions within the user defined list of names... Continue Reading →
How to quickly find similar geometric shapes and surfaces in Creo?
Starting with Creo Parametric 4.0, you can quickly find rounds, chamfers , sheet metal design objects from within a single, easy-to-use search tool. The Geometry Search tool allows searches based on geometry and design intent to Creo Flexible Modeling. Searches can be based on a seed surface or be defined without a seed. Search results appears in the Found... Continue Reading →
Did you know about these hole placement enhancements in Creo?
Starting with Creo 4.0, you can place a hole using an axis or point and a surface as references, even if - the axis is not normal to the surface or the point is not on the surface. Note: you can define the orientation of the hole regardless of how the hole is placed. When... Continue Reading →
How do you drag surface finishes beyond placement surface in Creo?
In Creo, if the placement surface is planar, then you can drag surface finishes in the XY direction beyond the placement surface. An extension line is created in the XY-direction when you drag the surface finish off the reference surface as shown below You can drag the surface finish in the Z-direction even when it... Continue Reading →